
Create a Metal Eater Slime!
Your ultimate guide to a mind-blowing magnetic experiment - turn a sticky booger into a super material with attraction powers and wow everyone at the science fair!
🎯 Your Scientific Missions
Every great scientist has a goal - here are yours!
- General Objective: Understand and demonstrate the principles of magnetism and non-Newtonian fluids by creating your own ferromagnetic slime.
- Personal Objective: Have fun with science, learn to follow the scientific method like a pro and develop the confidence to present your findings to the world.
🌍 The Operation Brain
Before we begin, let's understand the magic behind the experiment! Don't worry, it's easier than it looks.
What is this sticky stuff?
Slime is a polymer, which is like a very long string of pearls at the molecular level. It is also a non-Newtonian fluid. What a name! It just means that it is not decided whether to be liquid or solid.
- 💧 If you treat it gently, it flows like a thick liquid.
- ✊ If you hit it or squeeze it fast, it gets hard as a solid - like tomato sauce that doesn't want to come out of the bottle!
What about the power of attraction? 🧲
By adding iron powder, we turn our slime into a material that can be used for ferromagnetic. Iron is a metal that loves magnets. The iron particles inside the slime align with the magnet's magnetic field, making the entire slime move and appear to «devour» the magnet!
💡 Did you know?
Ferrofluid, a liquid cousin of our magnetic slime, was invented by NASA in the 1960s. They used it to move fuel in space without gravity - you're working with space technology!
🔬 Your Plan of Attack: The Scientific Method.
Let's do this like real scientists. Follow these steps to make your experiment a resounding success.
- Observation: You've seen videos or photos of slime that reacts to magnets - it looks amazing and almost alive!
- Question: Can I create my own slime that is attracted to a magnet? How much iron powder will make it more reactive?
- Hypothesis: «If I increase the amount of iron powder in the slime mixture, then its reaction to the magnet will be stronger and faster.».
- Experimental Design: This is the fun part! We are going to follow the recipe, but we will prepare 3 slimes with different amounts of iron powder to test our hypothesis.
- Data Registration: We will write down what happens to each slime. How fast does it move? Can it «climb» the magnet? We will use a chart to be organized.
- Analysis and Conclusion: At the end, we will look at our data and decide if our hypothesis was correct. What did we learn in the process?
🧩 Your Magnetic Laboratory
This is what your final creation will look like: a dark, mysterious puddle of slime that comes to life when a powerful neodymium magnet approaches. You'll see it grow spikes and tentacles that try to reach the magnetic source.
Scheme of Action:
⚠️ Watch Out Here! Caution Zone
- Borax may irritate the skin. Wear gloves and do not touch your eyes or mouth.
- The slime NO is eaten! It is an experiment, not a snack.
- Neodymium magnets are SUPER STRONG. Keep them away from credit cards, phones, computers and pacemakers. They can pinch the skin if they come together suddenly.
- Always ask for adult supervision.
🛠️ Your Scientist Kit
Here's everything you need, we give you options to fit your budget!
| Material | Economic Option | Standard Option (Recommended) | Pro Option |
|---|---|---|---|
| White glue | Generic school glue | Elmer's glue or similar | Pure PVA glue |
| Activator (Borax) | Liquid detergent with borate | Borax powder (supermarket) | Sodium borate solution 4% |
| Magnetic Powder | Very fine steel wool (from hardware store) | Iron oxide powder (online) | Pure and fine iron powder (specialized store) |
| Magnet | Strong fridge magnet | Ceramic hardware magnet | Neodymium magnet (the most powerful!) |
| Safety Equipment | Plastic bags in hands | Latex gloves and safety glasses | Nitrile gloves and lab goggles |
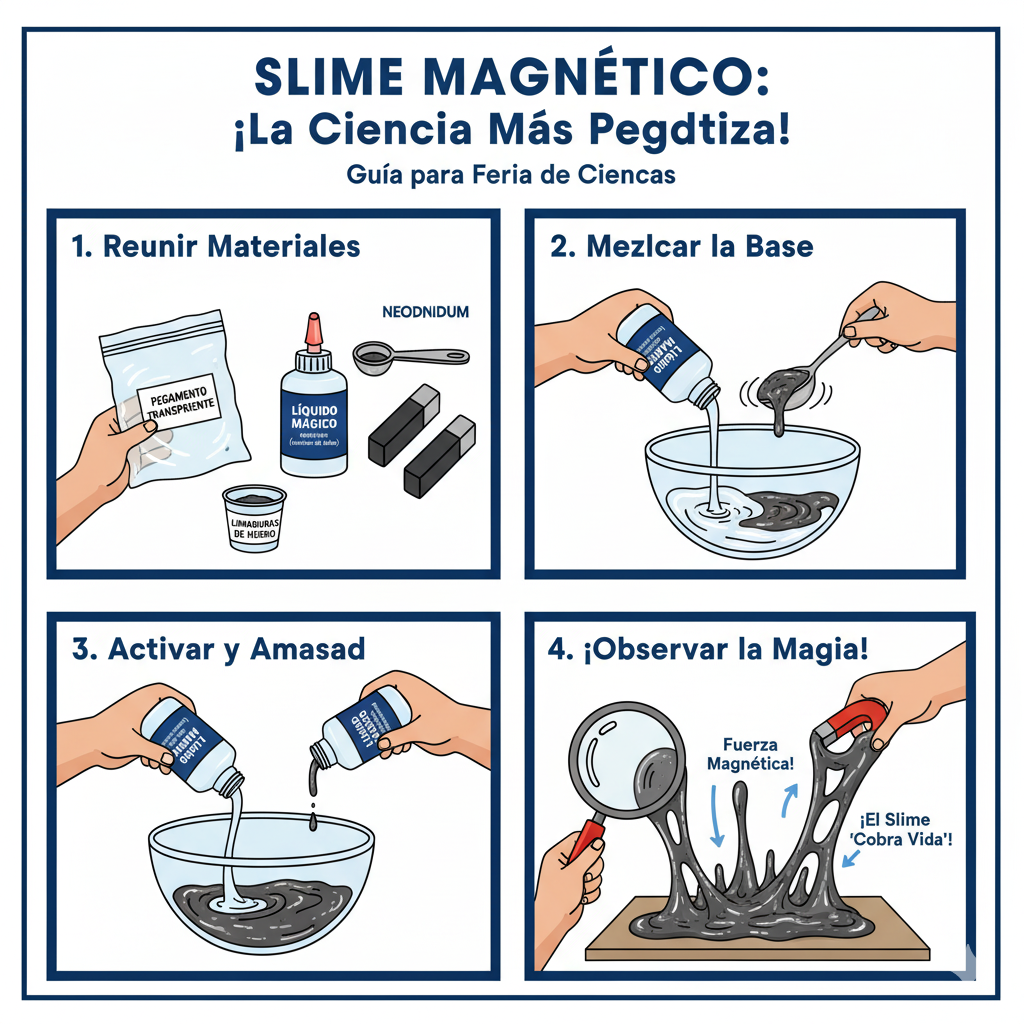
🧭 Your Adventure Map: Let's Create!
Follow the steps and in no time you will have your magnetic slime ready for action.
- Prepare the Activator (5 min): In a bowl, dissolve a teaspoon of borax in a cup of warm water. Stir well until there are no lumps - this is the magic potion that turns glue into slime!
- Base Mix (10 min): In another larger container, pour 1/2 cup of white glue. Add a half cup of water and mix until smooth. If you want, you can add black food coloring for a more intense look.
-
The Magnetic Touch! (5 min): Now, add the iron powder to the glue mixture. Start with 2-3 tablespoons and mix very well. This is where you can experiment for your hypothesis, creating one version with 2, one with 4 and one with 6 tablespoons.
🔬 Scientist Alert!
Wear a mask when handling iron dust to avoid inhaling it - safety first!
- Magic Happens (10 min): Very slowly, start adding the borax solution (the activator) to your glue and iron mixture. Pour a little bit in and stir. You will see it start to thicken. Keep adding a little at a time and stirring until it has the consistency of slime and comes away from the edges of the container.
-
Knead and Play (5 min): Take the slime out of the bowl and knead it with your hands (with gloves)! It will be sticky at first, but as you knead it, it will become perfect. If it's too sticky, add a drop more activator. If it is too hard, add a little more water.
⭐ Pro Tip
Store your slime in an airtight bag or container when not in use. It will not dry out and will last for weeks.
- The Final Test (Eternal!): Place your slime on a flat surface and slowly bring your neodymium magnet closer, watch the amazing reaction and write down your results!
🎪 Shine at the Science Fair!
Creating the experiment is only half the battle. Now, to communicate your findings like a champion!
Your Poster (Scientific Poster):
- Title Giant: Use the same or similar epic title of this guide.
- Visual and clean: Use the steps of the scientific method as sections. Few words, lots of pictures of your process!
- Graphics Are Key: Display your results in a table or a simple bar graph comparing the reaction of slimes with different amount of iron.
Interactive Ideas:
- Let the judges and visitors play! Have a piece of slime in a Petri dish and a magnet so they can try it out (with supervision!).
- Record a slow motion video of the slime reaction and display it on a tablet.
Phrases to Impress Judges:
«My hypothesis was confirmed: a higher concentration of ferromagnetic particles results in a higher magnetic susceptibility of the non-Newtonian fluid.»
«This experiment not only demonstrates ferromagnetism, but is also an excellent visualization of magnetic field lines in three dimensions.»
📎 Attachments: Your Toolbox
Data Recording Template
Use a table like this for each of your slimes. Be as detailed as possible.
| Test | Amount of Iron Powder | Reaction Distance (cm) | Reaction Speed (1-5) | Remarks |
|---|---|---|---|---|
| Slime 1 | 2 tablespoons | |||
| Slime 2 | 4 tablespoons | |||
| Slime 3 | 6 tablespoons |
Final Checklist
- I have all the safety materials (gloves, goggles).
- I have asked for adult permission and supervision.
- I understand the difference between Newtonian and non-Newtonian fluid.
- My hypothesis is clear and testable.
- I have prepared my 3 slime samples.
- I have entered all my data in the table.
- My poster is clear, visual and follows the scientific method.
- I have practiced my explanation out loud.
- I'm ready to have fun and teach!
Recommended Sources to Learn More
- NASA Space Place: To learn more about ferrofluids.
- Science Buddies: Great site with thousands of ideas for science fairs.
- YouTube channels such as Mark Rober or SmarterEveryDay: To see amazing science in action.