


The Egg in the Bottle 🥚🧪
Demonstrate the invisible force of air pressure with a jaw-dropping trick!
Clear and challenging objectives
- General Objective: To understand how temperature changes modify air pressure and can generate forces capable of introducing an egg into a bottle.
- Personal objective: Design and communicate a safe and convincing demonstration that explains the phenomenon to judges and the public at a science fair.
Simple and fun theoretical introduction
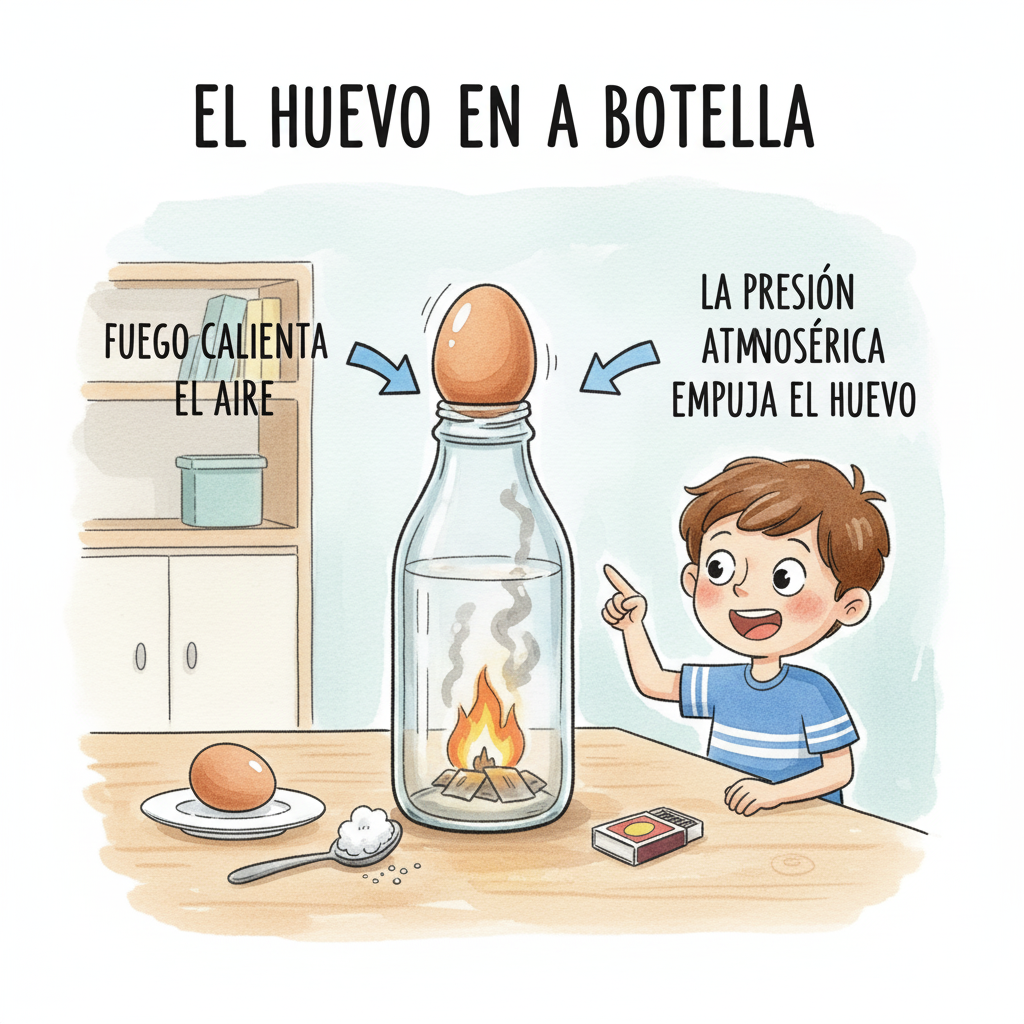
Air is not “nothing”: it is matter made of molecules that collide with everything. When the air is heated, its molecules move faster and tend to occupy more space (or to increase its pressure if the volume is fixed). On cooling, the opposite occurs. This experiment takes advantage of that change to create a pressure difference between the inside of the bottle and the outside.
- 🔥 Hot air inside → expands and part comes out of the bottle.
- ❄️ Air cools then → internal pressure decreases.
- 🌬️ Higher external pressure → pushes the egg inward.
Did you know? Atmospheric pressure at sea level is ~101 325 Pa. That's like having ~10 000 kg of air above every square meter... and yet we don't notice it!
Scientific method: your plan of attack
- Observation: A peeled hard-boiled egg can “fit alone” in a bottle with a narrow neck.
- Question: How do air temperature and egg sealing influence the phenomenon?
- Hypothesis: If we heat the air in the bottle and then let it cool with the egg sealing the mouth, the internal pressure will drop enough to push it in.
- Experimental design: Keep the size of the egg and the mouth of the bottle constant; vary heat source (lit paper vs. hot water) and record whether the egg enters, and in how long.
- Data collection: Time until egg begins to move, approximate bottle temperature (qualitative: warm/hot), observations.
- Analysis: Compare conditions that worked vs. failed; relate to pressure and temperature differences.
- Conclusion: Accept or refute your hypothesis and suggest improvements (e.g., dry the bottle better, use hot water instead of flame, etc.).
Graphic description of the model or assembly
Imagine a glass bottle with a narrow neck placed vertically on the table. The peeled hard-boiled egg rests on the mouth, sealing it. Inside, the air has been previously heated (with burning paper or hot water), and as it cools, the pressure inside decreases.
BOM with smart options
| Material | Economic option | Standard option | Professional option |
|---|---|---|---|
| Glass bottle (narrow neck) | Recycled juice or sauce bottle (clean and dry) | Laboratory-type bottle, 250-500 mL | Glass flask with calibrated mouth |
| Peeled hard-boiled egg | Medium size egg | Egg size L (best sealed) | Egg calibrated by size (experimental control) |
| Heat source | Hot water from tap (no flame) | Paper and match (with adult) | Thermal bath / hot air gun (with adult) |
| Security | Glass with water to turn off | Kitchen gloves | Thermal gloves + safety goggles |
| Measurement | Cell phone timer | Kitchen thermometer | IR thermometer + printed record sheet |
Step-by-step guide: your adventure map
- Set the stage (2 min): Dry the bottle well. Have the peeled hard-boiled egg ready. Pro Tip: the edge of the mouth must be clean to seal better.
- Heat the air (1-3 min): Safe optionFill the bottle with very hot water, wait 60 seconds, empty and dry quickly. Option with flame (with adult): light a small piece of paper and insert it into the bottle.
- Place the egg (≤30 s): Place it over the mouth. Observe: as the air cools, the internal pressure drops and the egg will begin to enter.
- Record the time (1-2 min): Use stopwatch: how long does it take to move and enter?
- Repeat with variations (5-10 min): Change egg size, temperature (more/less hot) or type of bottle.
Prepare your presentation for the fair
- Clear poster: Include a large title, assembly scheme, hypothesis and a table with your results.
- Interactive idea: It carries two bottles: one already heated and one at room temperature for live comparison.
- Phrases that impress: “The pressure difference between the inside and outside applies a net force on the egg.”
- Ethics and security: Point out how you avoided using flame or how you controlled it with supervision.
Useful appendices
Data logging template
| Test # | Initial temperature (qualitative) | Time to movement (s) | Did the egg enter (Yes/No)? | Remarks |
|---|---|---|---|---|
| 1 | Tibia | |||
| 2 | Hot | |||
| 3 | Very hot |
Checklist
- ✔️ Clean and dry bottle
- ✔️ Peeled hard-boiled egg of appropriate size
- ✔️ Selected and safe heating method
- ✔️ Timer/thermometer ready
- ✔️ Printed data sheet
Recommended sources
- Gas and pressure popularization books (high school level).
- Science museum resources on atmospheric pressure y ideal gas.